I am not a huge fan of desserts, but when hosting a casual holiday party, it's fun to offer something simple and tasty to satisfy your guests' sweet cravings.
A simple way to do this is to add some {store bought} truffles to a large platter and surround them with cordial glasses. Then you can set out a number of after dinner drinks such as Kahlua, Baileys, Frangelico, etc.
Your guests can choose their cordial and enjoy a decadent dessert at the same time!
Showing posts with label Desserts. Show all posts
Wednesday, December 4, 2013
Sunday, September 22, 2013
Gooey Caramel Corn.....or do you like it Crunchy?
My friend Gretchen was kind enough to be my guest columnist this week for my article in The Ledger - it was such an easy and awesome recipe, she gave me the "A-OK" to post it on the blog as well. Here it is - I hope you'll will try it, come back to comment, and let us know how much you enjoyed it! Happy 1st Day of Fall!!!
Post and photo credit: Gretchen Wakeman
For my local followers, if you are looking for a family and lifestyle photographer, please visit Gretchen's site at Gretchen Wakeman Photography to see her work and contact information.
Post and photo credit: Gretchen Wakeman
I purchased this recipe almost 30 years ago at
an Elementary Bake Sale. Along with all of
the freshly prepared baked goods, my elementary school also sold recipes for a
quarter to help with the fundraising.
My 25 cent purchase bought me a recipe that has
become somewhat of a legacy in my family.
Even as a little girl I loved to bake. I became an expert at this recipe at a very
young age. I had it memorized and could whip up a batch of Gooey
Carmel Corn at any given family event.
We looked forward to it at family movie night, birthday parties, or any
event that called for a little sweet celebration.
The original recipe has since been lost, but I had written the
instructions down on a plain notecard.
Recently, my mom found my hand written recipe tucked away in her
cookbook. She smiled when she gave it
back to me, “Remember when you used to
make your Gooey Caramel Corn?”
To celebrate the return of Fall, I have already whipped up
several batches to share with my two little girls. Without a doubt, this recipe will be in my
family for years to come. Enjoy!
Gooey Caramel Corn
Makes
8 Cups
1 packed cup of brown sugar
1/2 cup of butter (one stick)
1/2 cup of light Karo syrup
1/8 teaspoon of salt
1/8 teaspoon of baking soda
Approx. 8 cups of popped popcorn
Prepare popcorn without butter or salt. Place popcorn in a large mixing bowl.
On stovetop combine brown sugar, butter, Karo
syrup and salt. When mixture gets to a
rapid boil add 1/8 teaspoon of baking soda and stir. (The baking soda will cause the mixture to
expand and turn foamy)
Immediately pour the hot mixture over the
popcorn. Fold in caramel until popcorn
is well coated. I normally stop
here. I love to eat it gooey and
warm.
If you prefer Crunchy Caramel Corn and have
the willpower to wait, you can bake it in a large roaster pan for 1 hour,
stirring every 15 minutes. Spread on
waxed paper to dry.
Thanks for taking the time to read my guest column. I hope you will try the Gooey (or Crunchy!) Caramel Corn.
Sunday, December 23, 2012
Chocolate Pizzelles
Pizzelle making is a tradition in my rather large Italian family..... and for some, it's not just during the holidays, but all year round! I have never actually made them by myself.....until this year. I've helped my dad in the past, watched my brother make them, seen photos of other family members pizzelles, this year I was ready for a solo attempt.
I'm not big into holiday baking, I'm usually so exhausted by the time December rolls around and getting through all of the parties - it doesn't happen. But this fall, I purchased a Cucina Pro Pizzelle Maker from my cousin Dino at Valente's Deli Bakery & Italian Market and my parents brought it down for me during a recent visit. A pizzelle iron is key to making pizzelles - so it will be something you have to purchase if you don't have one! Here is an image of the one I have below.
You may remember that I visited Valente's Deli Bakery & Italian Market a few months ago - you can check out that blog post here.
Making these Italian cookies really isn't hard - the first couple of pizzelles sometimes stick. I sprayed my iron with a little bit of olive oil spray before getting started.
The recipe below is a combination of what was in the book that came with the iron as well as input from my dad. Everyone in my family has their own recipe....and like many dishes my family makes, most don't want to share their secrets! The hubby isn't a big fan of anise, so I decided to start with a batch of chocolate pizzelles instead of traditional ones with anise (some use seed, some use oil - we'll save that for another blog post!)
These make great gifts for the holidays - I remember giving them to MY teachers each year before Christmas Break. My parents were even clever enough to save coffee cans throughout the year and wrap them with Christmas paper.....pizzelles fit PERFECTLY into a coffee can....although, can you still buy coffee in a can? Not sure about that one....
I hope you have fun with your pizzelle making this year, I look forward to adding it as an annual tradition in my home!
Chocolate Pizzelles
Makes about 2 dozen
3 large eggs
1 cup sugar
2 teaspoons vanilla extract
1 stick butter, melted and cooled
1 3/4 cup all purpose flour
2 teaspoons baking powder
3 tablespoons cocoa
Beat eggs and sugar until light yellow. Add cooled, melted butter (make sure it is cooled so you don't end up with scrambled eggs) and vanilla. Beat until blended. Sift remaining ingredients and add to mixture. Fold until just blended.
Heat pizzelle iron. I would suggest spraying with a little bit of olive oil spray first. Add about 1 tablespoon of batter on grid just behind the center of the pattern. Bake until golden brown, about 30-40 seconds. Remove and cool on a rack. Repeat with remaining batter.
I'm not big into holiday baking, I'm usually so exhausted by the time December rolls around and getting through all of the parties - it doesn't happen. But this fall, I purchased a Cucina Pro Pizzelle Maker from my cousin Dino at Valente's Deli Bakery & Italian Market and my parents brought it down for me during a recent visit. A pizzelle iron is key to making pizzelles - so it will be something you have to purchase if you don't have one! Here is an image of the one I have below.
You may remember that I visited Valente's Deli Bakery & Italian Market a few months ago - you can check out that blog post here.
The recipe below is a combination of what was in the book that came with the iron as well as input from my dad. Everyone in my family has their own recipe....and like many dishes my family makes, most don't want to share their secrets! The hubby isn't a big fan of anise, so I decided to start with a batch of chocolate pizzelles instead of traditional ones with anise (some use seed, some use oil - we'll save that for another blog post!)
These make great gifts for the holidays - I remember giving them to MY teachers each year before Christmas Break. My parents were even clever enough to save coffee cans throughout the year and wrap them with Christmas paper.....pizzelles fit PERFECTLY into a coffee can....although, can you still buy coffee in a can? Not sure about that one....
I hope you have fun with your pizzelle making this year, I look forward to adding it as an annual tradition in my home!
Chocolate Pizzelles
Makes about 2 dozen
3 large eggs
1 cup sugar
2 teaspoons vanilla extract
1 stick butter, melted and cooled
1 3/4 cup all purpose flour
2 teaspoons baking powder
3 tablespoons cocoa
Beat eggs and sugar until light yellow. Add cooled, melted butter (make sure it is cooled so you don't end up with scrambled eggs) and vanilla. Beat until blended. Sift remaining ingredients and add to mixture. Fold until just blended.
Heat pizzelle iron. I would suggest spraying with a little bit of olive oil spray first. Add about 1 tablespoon of batter on grid just behind the center of the pattern. Bake until golden brown, about 30-40 seconds. Remove and cool on a rack. Repeat with remaining batter.
Wednesday, November 28, 2012
Pound Cake, Strawberries, and Dark Chocolate Skewers
This is another yummy treat from the 2011 holiday season.....I saw this image on Pinterest and loved the idea so decided to serve it for the Couples Euchre Night we hosted last December.
Instead of angel food cake, I used frozen pound cake thinking it would stay on the skewers better. Alternating strawberries and pound cake, I threaded them onto a skewer. After melting some dark chocolate over a double boiler, I drizzled over the skewers and refrigerated until serving.
Sunday, November 25, 2012
Pumpkin Snowballs
I ran across this cute little recipe in my November issue of Parenting magazine - it looked easy, somewhat healthy, and a great way to finish off Thanksgiving weekend. There are a couple of modifications to the original. While getting the oatmeal out of the pantry, I decided to add some wheat germ and then dropped in a couple of more tablespoons of pumpkin puree to balance it out.
The result? My boys loved them - as did I and my visiting mother-in-law. Total prep time was 10-15 minutes (includes time spent defending myself from lightsaber attacks in the kitchen from a 3 year old and 6 year old). Quick and easy!
Pumpkin Snowballs
Makes approximately 12 snowballs
Recipe adopted from Parenting magazine
1 cup oatmeal
1/4 cup wheat germ
1/2 teaspoon pumpkin-pie spice
5 tablespoons pumpkin puree
1/4 cup brown sugar
1/4 cup raisins
3/4 - 1 cup powdered sugar
Combine oatmeal, wheat germ, pumpkin-pie spice, pumpkin puree, brown sugar, and raisins in a bowl. Form into 1-inch balls and roll in powdered sugar.
Sunday, November 18, 2012
Peanut Butter Dark Chocolate Rice Krispie Treats
I hadn't baked a treat for my boys in awhile so decided today to make some Rice Krispie Treats, but wanted to add a little bit more. So thought that peanut butter chips and dark chocoloate chips would be tasty additions!
Following the standard Rice Krispie recipe, I simply added about 1/2 cup of each of the chips once I was mixing in the Rice Krispies. The chips did "clump" a little in certain places - but it worked out well because one of my boys isn't a huge fan of chocolate so I was able to give him a square without a whole lot of chocolate. After talking to a friend of mine, she was telling me how her grandmother made something simliar but would melt chocolate, peanut butter, and butterscotch chips together and then pour on top of the treats once they were in the pan - that is certainly an option too!
Peanut Butter Dark Chocolate Rice Krispie Treats
Serves 12
Original Rice Krispie Treat courtesy of Kellogg's
3 tablespoons butter or margarine
1 package (10 oz) regular marshmallows or 4 cups miniature marshmallows
6 cups Kellogg's Rice Krispies cereal
1/2 cup peanut butter chips
1/2 cup dark chocolate chips
In a large saucepan melt butter over low heat. Add marshmallows and stir until completely melted. Remove from heat.
Add Kellogg's Rice Krispies cereal, the peanut butter chips, and the dark chocolate chips. Stir until well coated and combined.
Using buttered spatula or wax paper evenly press mixture into a 13 x 9 x 2-inch pan coated with cooking spray. Cool. Cut into 2-inch squares. Best if served the same day.
To microwave, in a microwave-safe bowl, heat butter and marshmallows on high for 3 minutes, stirring after 2 minutes. Stir until smooth. Follow above steps to finish.
Notes from Kellogg's:
-For best results, use fresh marshmallows.
-1 jar (7 oz.) marshmallow crème can be substituted for marshmallows.
-Diet, reduced calorie or tub margarine is not recommended.
-Store no more than two days at room temperature in airtight container.
-To freeze, place in layers separated by wax paper in airtight container. Freeze for up to 6 weeks. Let stand at room temperature for 15 minutes before serving.
Tuesday, November 6, 2012
Christmas Tree Cupcakes
I made these adorable cupcakes for Christmas dessert in 2011. Images of Christmas Tree Cupcakes flooded Pinterest last year - I did some research while writing this post and can't even figure out which image I used for my inspiration there are so many!
Nothing from scratch on this recipe, except for the fondant, I needed such a small amount, decided to make it myself. I used Betty Crocker's Super Moist Dark Chocolate Cake Mix for the cupcakes - and a cute Christmas themed cupcake liner from Michael's.
Once the cupcakes were cool, I moved onto the decorating phase. For the frosting - back to my favorite, Betty Crocker's Whipped Vanilla and simply added Wilton's Leaf Green Icing Color to get the frosting to the color consistency I wanted.
To create the "ribbon/leaf" effect while making the trees, I used Wilton's No. 70 Leaf Decorating Tip. One lesson I have learned over the past couple of years when decorating cupcakes is to start with your first "mound" of frosting to the middle of the cupcake, then starting on the outside of the cupcake, frost all the way around building on top of that initial drop. That will help give it the height you are wanting here.
To decorate, I sprinkled Betty Crocker's Pearls Cupcake Gems around the frosting of the cupcake. I'm not sure why these are not on Betty's site, but I couldn't find them there! I bought them from my local grocery store.
For the stars, I made the fondant by combining marshmallows, water, and powdered sugar in a microwave safe bowl. I microwaved on high in 30 second increments, stirring in between until the marshmallows were well combined with the water and powdered sugar.
Being very careful of the fondant - it will be hot - and wearing latex gloves covered in shortening (to prevent sticking), I moved to a workspace dusted with powdered sugar to knead in my food coloring - Wilton's Golden Yellow Icing Color until combined well and is like a "dough-ey" consistency. Then, rolled it out and with a small star cookie cutter, cut out the stars.
These were the perfect dessert for Christmas day. In 2011 we enjoyed dinner at the home of good friends and the eyes of the children (and adults!) when they saw the cupcakes were wide with anticipation!
Sunday, July 1, 2012
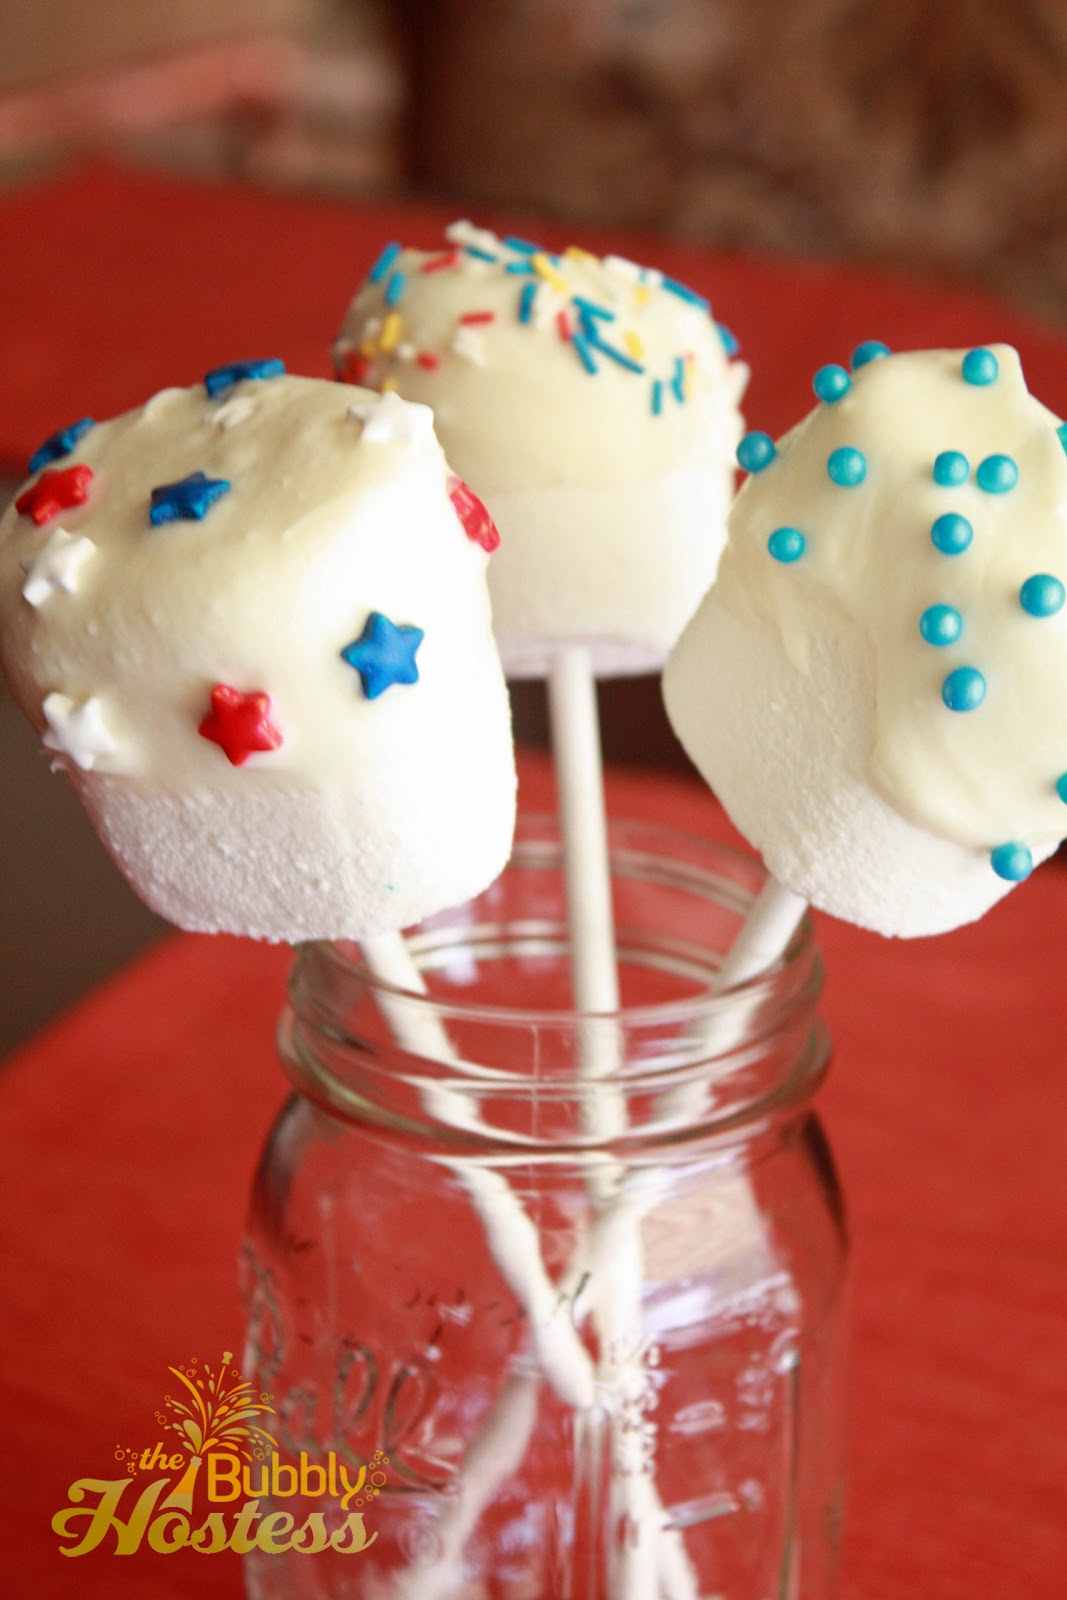
Patriotic Marshmallow Pops
I wanted to create some patriotic treats in honor of July 4th being right around the corner, so I decided to get some marshmallows, white chocolate, and fun sprinkles! While shopping, my boys and I decided that the "giant" s'more marshmallows would be way better for this than just regular ones - so that's what we bought!
Ingredients
Makes about 20 pops
2 bags of White Chocolate Wilton Candy Melts
12 oz bag of Giant Roaster Marshmellows
Assorted patriotic sprinkles
20 lollipop sticks
Melt the chocolate over a double boiler. Insert a lollipop stick into a marshmellow, dip into melted chocolate, a little less than 1/2 way, cover with sprinkles!
For the "drying", I used mason jars and glassware so that the pops could stay upright while drying.
Subscribe to:
Posts (Atom)